Drupal Performance Mantra: Crawl, Boost, Expire
Thanks to its enormous flexibility, the open-source Drupal framework can serve as a reliable base to develop virtually any website. Even non-programmers — thanks to the many thousands of free extensions providing all sorts of handy functionalities (known as modules) — can build anything from simple blogs to complex organizational portals or intranets and web shops. This versatility has downsides, however, one of the starkest being a relatively low page loading speed. Each new enabled module means a tiny bit longer code execution time and sooner or later many of us end up with pretty but slow-loading, underperforming websites. First, we should always be extremely prudent about enabling features that may actually not be needed for the given site. Second, we should learn the art of efficient data caching to make sure that identical results, on whichever level, are not needlessly computed over and over with every users's click. In this article we will focus on the latter option, providing a recipe for a particularly a potent concoction of modules to achieve a lightning-fast page loading for anonymous visitors of your Drupal 7 website.
Avoiding Drupal#
The Boost module is a surprisingly effective static file caching tool to dramatically speed up pretty much any Drupal website. The trick it employs is in that it actually tries to avoid running Drupal as often as possible.
It provides caching on the level of whole web pages. If a particular version of a page happens not to be cached, Drupal will of course be asked to run through its convoluted logic of permissions, menus, database calls, and all that. Heavy pages often take several seconds to complete. Getting under the magic limit of 1 second is a prized UX and SEO art — but that's another story.
Thanks to Boost, even if your page takes several seconds to load, it will do that just once. The next time it will be fired blazing fast as a little compressed HTML file directly by the Apache web server, completely avoiding not just Drupal but any MySQL or PHP processing, easily delivering a page in a matter of milliseconds.
There indeed are even more performant caching layers. On dedicated servers, we surely may want to consider Varnish instead. In my experience, however, the various Varnish caching recipes out there are actually much less customizable than Boost, and they lack the sweet sense of completeness provided by Boost and its companion modules described further in this article.
Expiring Intelligently#
Boost is good at making sure that a page request does not ask Drupal for the page content more than one single time. The problem is that without talking to Drupal it never learns when a page is updated. It will tirelessly continue its rapid delivery of pages — but their content will become stale.
Not forever, of course — Boost has settings for cache expiration time. We can set it to get a fresh version of the pages after a given time period, e.g. after 6 or 12 hours after the initial caching.
However, that is rarely good enough for any larger or busier website. Imagine a site with 300,000 pages that has 3,000 page views every hour, and with 30 page updates every hour. Some of the pages are more popular than others, so let's say that after 6 hours there are some 10,000 pages cached. In the 6 hours, 6 x 30 = 180 pages have been updated. Say 100 of them had been initially cached, meaning Boost is now serving stale content for those pages. Then the configured expiration time starts elapsing for the cached pages and Drupal is again tasked to slowly compute each of them. It happens gradually, since each page is cached at a bit different time and so they do not expire simultaneously either. But in the end, 10,000 pages will be expired and re-computed even though 9,900 of them remained unchanged. What a waste of resources and more, what a waste of time our users have to spend while Drupal re-computes the identical pages!
Enter the Cache Expiration module, a nifty little module that allows us to configure what pages get expired when something happens. We can set whether node pages get expired on node insert, update or delete, and whether the front page should also be expired at that moment (which is often needed), and possibly also the taxonomy term pages related to nodes, or any number of other custom URLs. Even better, we can do this per content type — making it possible that e.g. adding an image node, which anyway does not have a page display of its own, does not expire the cache of all nodes! And we can configure similar behaviour for comments, files, and for user pages. After a page is expired, it will be re-generated by Drupal the very next time it is requested.
Let's consider our above example benefitting from the Cache Expiration module. For simplicity, say that all of the 100 cached pages happen to be nodes with content imported or updated from an RSS feed. In such case, only the content type for feed items will get expired but all other content — e.g. articles, news, products, links, etc. will remain cached. Only 100 instead of 10,000 pages will have to be re-generated.
With Cache Expiration module we can set the Boost's blanket expiration time much higher, e.g. to a few days or even weeks, knowing that the pages that are changed will have their cache expired automatically.
Crawling in the Background#
The world of caching scenarios is complex because of the number of variables we need to take into consideration. Our performance improvement above may look impressive but we can still do much better. Let's do another thought experiment on our example site from above.
On our site of 300,000 pages there are several content types. One of them is called "Article", with 50,000 nodes. Our Boost expiration is set to 1 week because we rely on the more selective Cache Expiration functionality. So after 3 days our website visitors (including search engine spiders) happened to click on all 50,000 articles. Then somebody notices a small typo in one of the articles, we fix it and save the page, but by doing that we expire all 50,000 articles. That means our users will collectively have to endure 50,000 slow page loads again in the coming days before all articles are cached again. They won't be happy. And anyway, why do users have to spend their time to generate Boost cache on our website?!
Enter Boost Crawler, which is in fact a new sub-module of the Boost module. First of all, its name is incorrect — it does not crawl the way search engine spiders do, discovering and following links. What it does is pre-caching pages that happen to expire from Boost cache. And it does that in the backround, using another excellent helper module called HTTP Parallel Request & Threading Library. If our 50,000 articles get expired, at each cron run the HTTPRL module spawns several background processes and invisibly caches a number of the pages without bothering the user. Obviously, shortly after the mass expiration, it will still happen that our users will request a page that is not yet re-cached by HTTPRL, but over time the chances of that happening will continue to diminish.
The Recipe#
Here's a complete set of steps to configure the magic bullet for your Drupal 7 performance.
Get Boost, Cache Expiration, and HTTP Parallel Request & Threading Library. On the Modules page (/admin/modules), enable "Boost", "Boost Crawler" and "Cache Expiration". You may immediately enable also "HTTP Parallel Request & Threading Library" — or it will be enabled automatically since it is required by Boost Crawler.
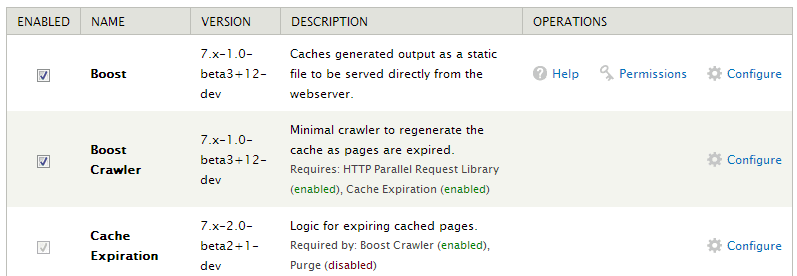 Enabling modules
On the Boost Settings tab (/admin/config/system/boost), adjust the Maximum Cache Lifetime to a long period, e.g. 1 week, or even longer. Make sure the Minimum Cache Lifetime remains zero. (Leave XML and Ajax/JSON file caching off for the time being — you can activate those later if needed.)
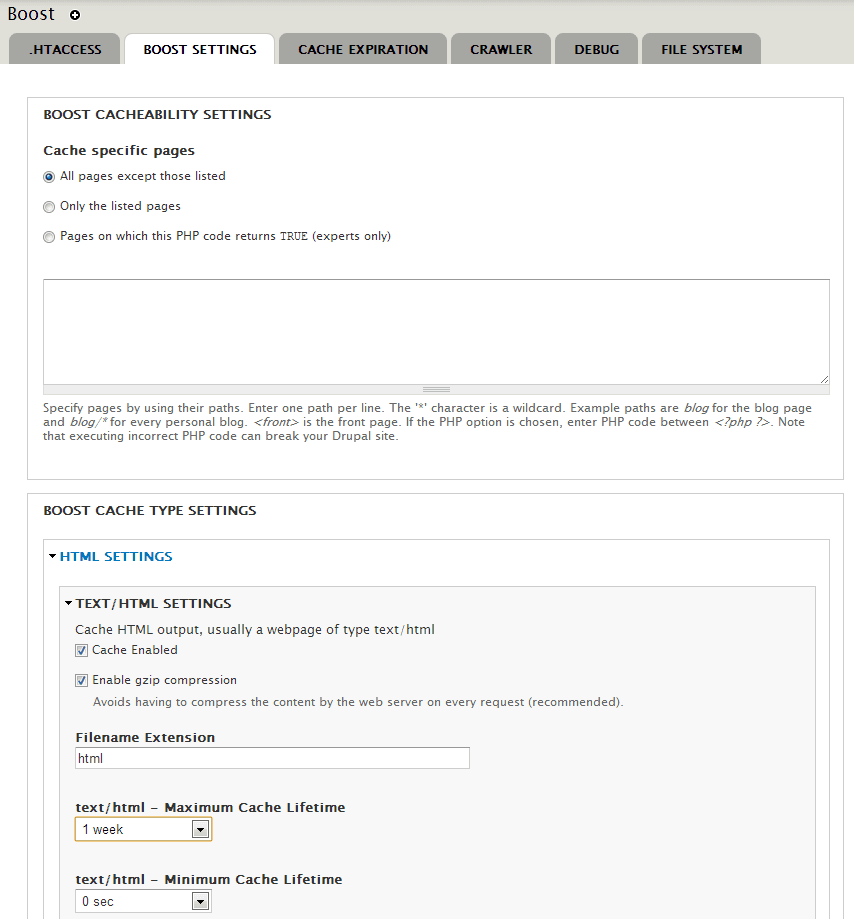 Boost settings
Boost will not function properly while Drupal core cache is enabled. Go to the Performance page (/admin/config/development/performance) and make sure that "Cache pages for anonymous users" is NOT checked.
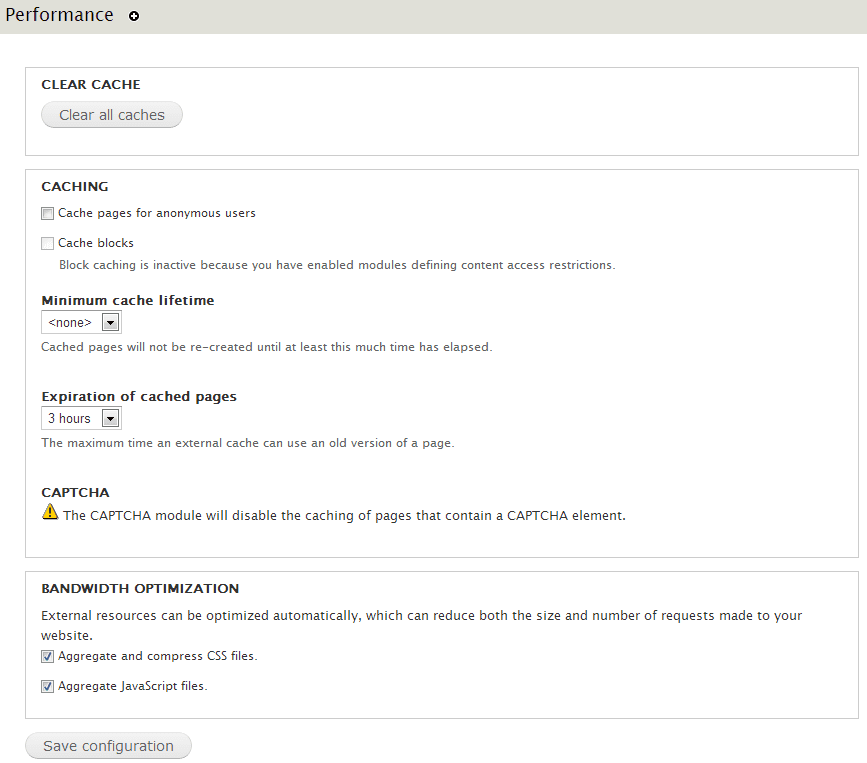 Performance settings
Review the .htaccess Settings subtab on the .htaccess tab (/admin/config/system/boost/htaccess). For most Apache servers, you should not need to change any of them.
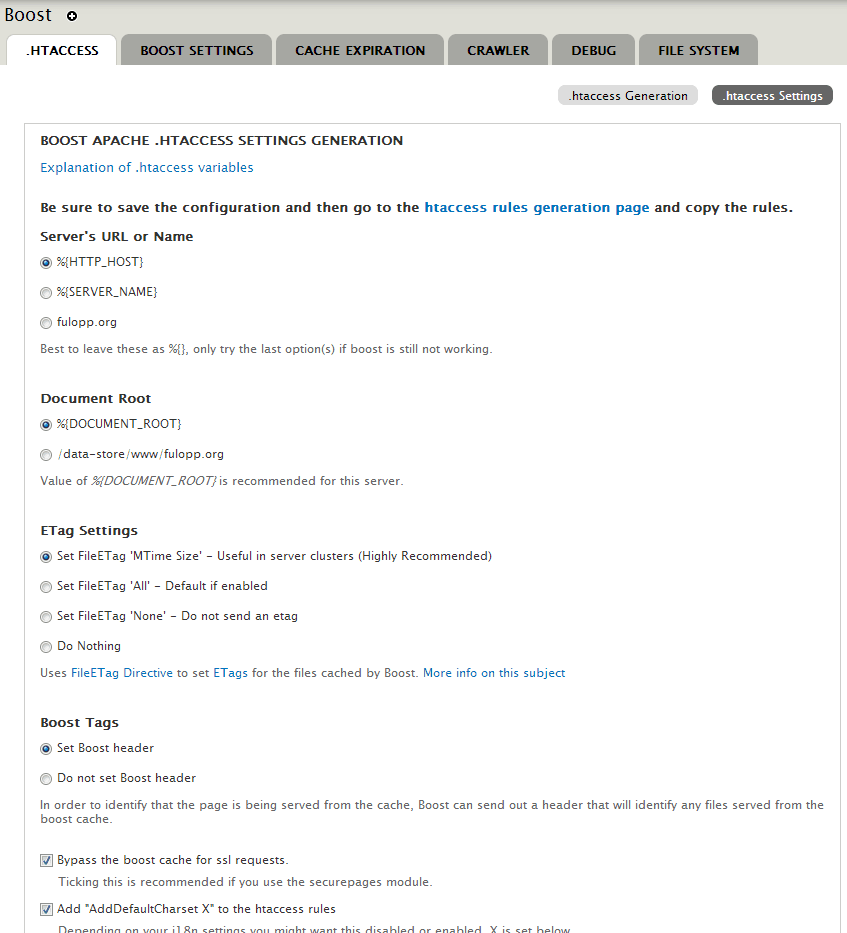 .htaccess settings
Time to adjust your .htaccess file on the server. Go to the .htaccess Generation subtab on the .htaccess tab (/admin/config/system/boost/htaccess/generator), copy the generated rules, and paste them in the required location in your .htaccess file (see instructions at the end of the page).
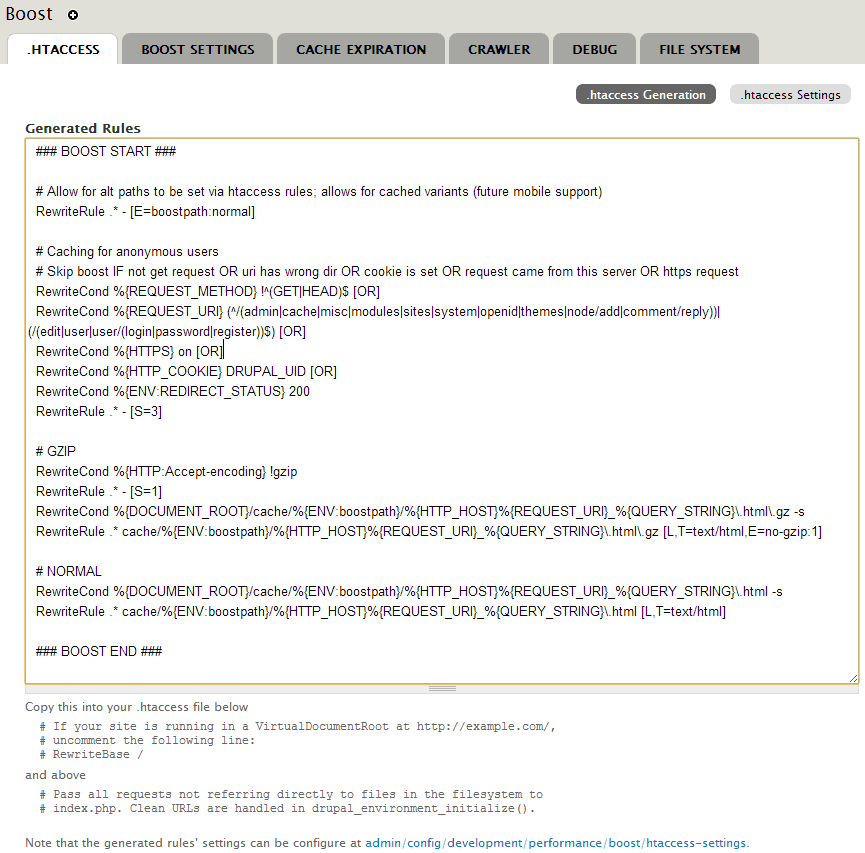 .htaccess generation
Go to the Status report page (/admin/reports/status) and check for any problems related to Boost. For example, you may see something like "Boost Cache path cache/normal: does not exist". The problem is that Boost expects to have a folder called "cache" (to hold all the cached files) not in the usual folder (under /files) but in the root of your Drupal installation. In such case, create folder "cache" manually in the root (where your index.php file is) and give it such permissions that Apache can read and write to it (tip: it needs the same permissions as the generated folders in your files directory have). (Better still, create a cache folder out of your web path and symlink to it.)
 Status report
Let's test whether your anonymous pages are getting cached. Go to the Blocks page (/admin/structure/block) and show block "Boost: Pages cache status" in one of the regions — I often put it below the footer. Save the blocks page. Make sure you permit this block to show only for trusted roles (/admin/structure/block/manage/boost/status/configure).
Now go to another browser where you are not logged into the site (or log out in the current browser) and go to one of your pages as an anonymous visitor. Then go to the same page as admin. The Boost cache status block should confirm to you that the anonymous page has been cached by Boost. It also allows you to flush any single cache file, which is often useful during testing.
 Boost status block
Alternatively, you can look at the source of the anonymous page directly. If you scroll to the very end of it, you should see something like this:
 Boost status in HTML source
Go to the Cache Expiration tab (/admin/config/system/boost/expiration) and make sure both options are checked.
 Boost cache expiration
Go to the Crawler tab (/admin/config/system/boost/crawler) and make sure the cron crawler is enabled.
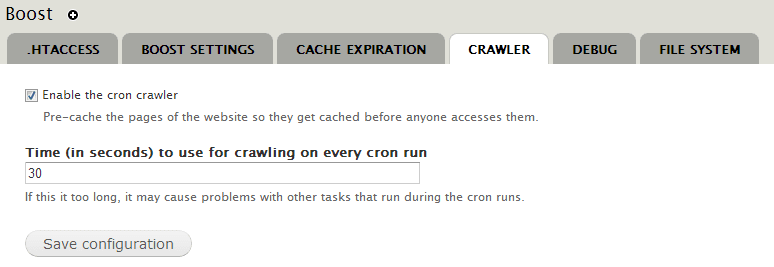 Boost crawler
The Debug tab does not need any change at this moment.
 Boost debug
The File System tab needs no change either.
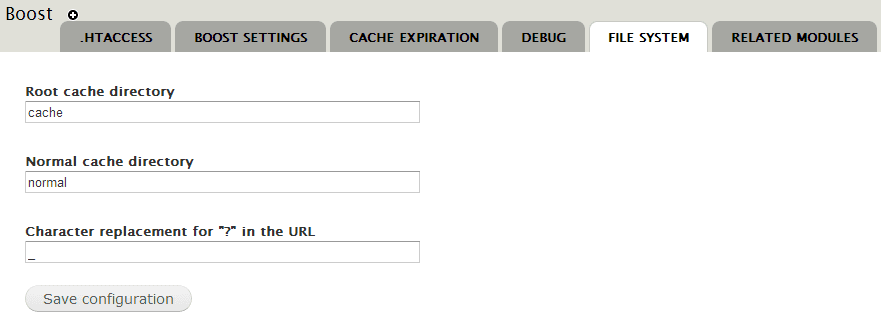 Boost file system
Now let's see the Cache Expiration settings at /admin/config/system/expire
On the Module Status tab, select "External expiration" — allowing Boost and Boost Crawler to use hook_expire_cache().
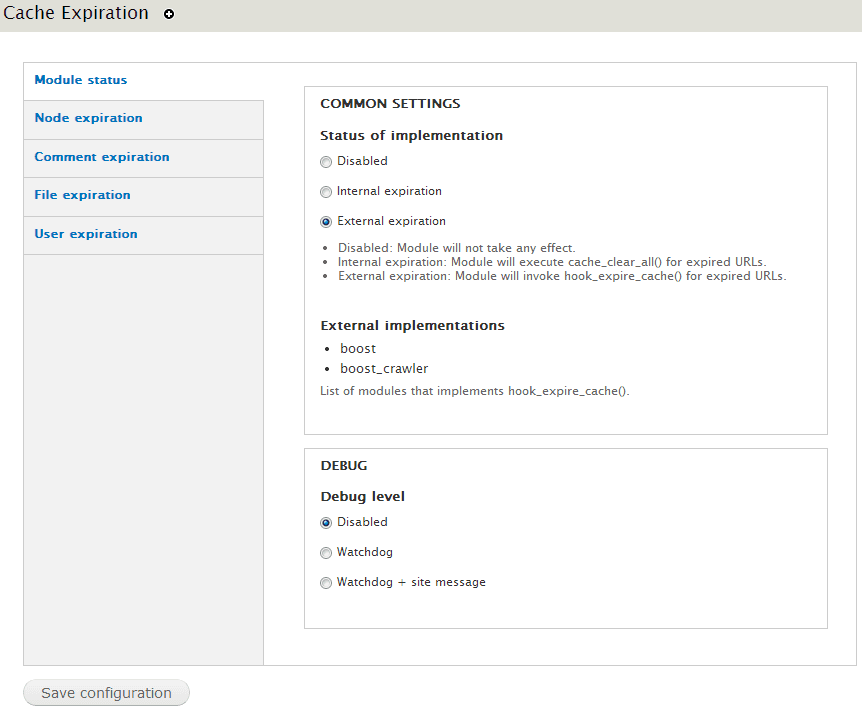 Cache expiration
There is no need to change the other tabs (Node expiration, Comment expiration, etc.) on the main Cache Expiration settings page. Leave all of them disabled. (Instead, we will later use a finer expiration logic on the level of content types.
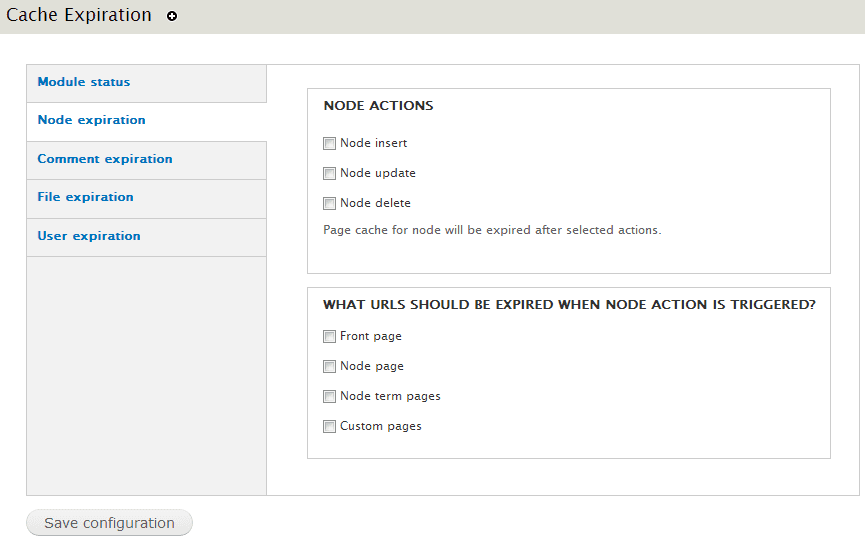 Node cache expiration
Now, let's say you have a content type called "Article" and if there is a node updated, deleted, or changed, you would want to update its nodes. You also want the front page to update its cache (perhaps you have a view embedded there that displays articles). Further, you know you use the article nodes on two views pages: /news and /articles, and the /articles page may take arguments, such as /articles/2013, /articles/2012, etc.
Go to /admin/structure/types/manage/article and select "Node insert", "Node update", "Node delete". Check "Front page" and "Custom pages". (Do NOT check "Node page" — that would expire all nodes in that content type. We will do that per page using Rules later.
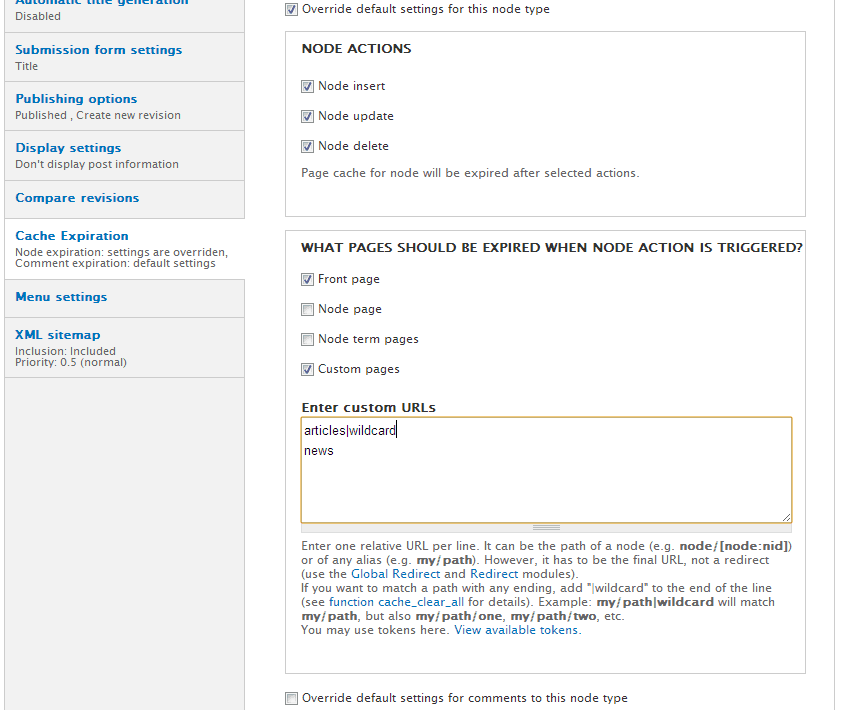 Cache expiration per content type
Finally, we also need to detect when individual nodes are updated, deleted, or changed, and then act on its Boost cache. To do that, download the Rules module and enable the core module and also Rules UI module.
Go to /admin/config/workflow/rules and click "Add new rule". Give it a name, e.g. "On add/update/delete, expire given page from Boost Cache". Under "React on event" select "After saving new content". Click the "Save" button.
Then add two new events: "After deleting content" and "After updating existing content". Now add condition "Content is published", and then add action "Clear URL(s) from the page cache", using "node/[node:nid]" in the "Value" field.
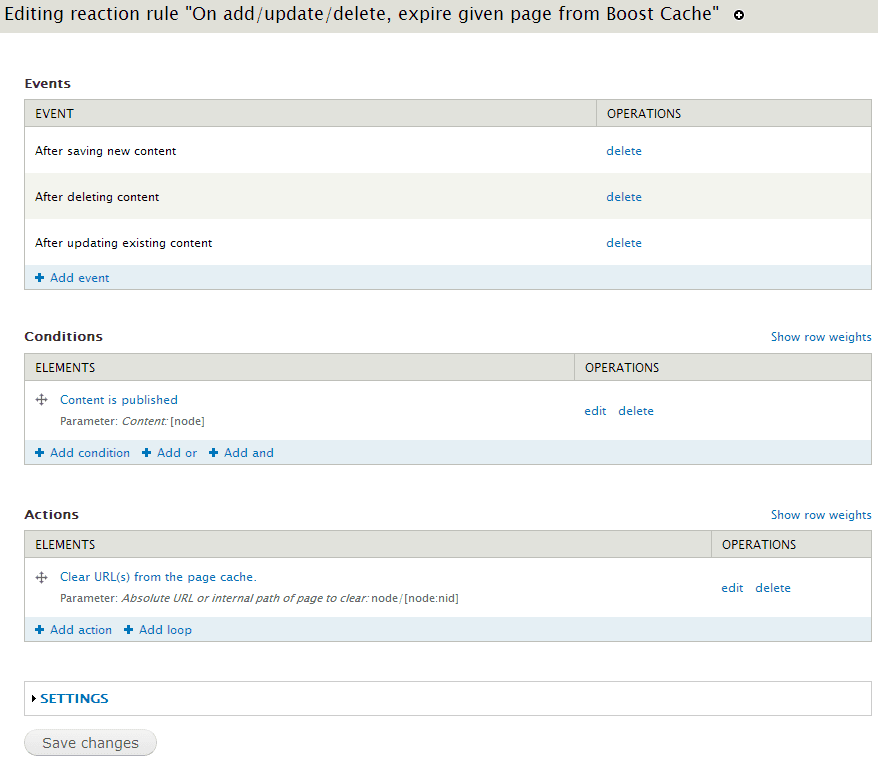 Adding an expiration rule
The last thing we need to do is verification of the new cache logic.
Consider your front page, two views (one using articles, the other not), and two article nodes. Check that all of these are cached (have Boost stamp). Then edit and save one of the articles. Its cache stamp should disappear — meaning it is no longer cached. Also the front page and the view that uses articles should lose its Boost stamp. However, the other view, which we do not let expire under content type Article settings, will keep its original stamp. Same for the other, unchanged article — it keeps its old cache. Also all other views and nodes of other content types will keep their original caches.
And we also need to check that the Boost Crawler works fine. Run your cron — once or several times. Then check the changed article, front page and the article view cache stamps — they should all now be present.
List of Ingredients#
Not all of the following modules are necessary, but all of them contribute to the smoothest possible intelligent file caching experience.
Magic potion ingredients#
Recommended seasoning#
See also the Related Modules tab at /admin/config/system/boost/listmodules
ParentsSiblings- Gatsby & Drupal: In Quest of an Ideal Coupling
- reSmush.it image style optimizer
- Recacher
- Puzzler
- Link Replace Filter
- Google Analytics Referrer
- PagePeeker Screenshots
- Google Analytics Counter
- TrailScout
- Hypergraph
- Brilliant Gallery
- Kinpedia
- https://www.drupal.org/project/boost
- https://www.drupal.org/project/expire
- https://www.drupal.org/project/httprl
ENGLISH ARTICLENOVEMBER 2, 2025 AT 24:08:26 UTC
